Tagged: tips
Using the Bellini’s steamer
The Bellini has a large steaming dish (similar to Thermomix’s Varoma) that sits on top of the jug and allows you steam chicken, vegetables, puddings – anything. Below are eight (hopefully useful) things I’ve learned about the steamer
1. To steam effectively, you must set the temperature to ST. Turn the temperature dial all the way to the top setting (it’s the one after 100). It looks a bit like SF to me, but it’s meant to be ST. Cooking on 100C won’t produce enough steam. So if you want to cook a soup and steam fish at the same time, you must cook your soup on ST, not 100.
2. ST temp is approximately 110C. Thermomix’s Varoma temp is 114. So you will need to allow a longer cooking time when using a Thermomix steamer recipe in your Bellini.
3. Also when using your steamer, please note that it’s a bit of a different design to the Thermomix Varoma (see here for more details if interested). Basically, the TMX steamer contents are exposed to more steam, so again, keep this in mind and increase your cooking times accordingly.
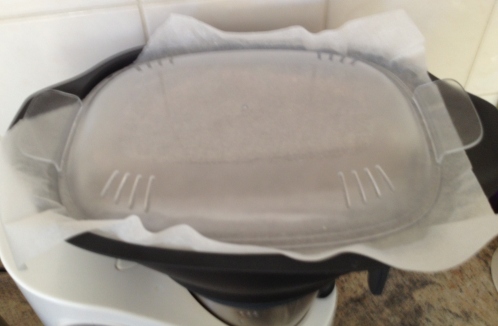
4. To make steaming in the Bellini more effectively, try draping a tea towel over some of the vents in the lid, or placing a piece of baking paper under the lid to keep more steam in (as in the pic above).
5. Always use speed 3 when steaming – this will get more steam to your food.
6. If you are placing food in the bottom of the steaming tray, arrange it around the outside and not in the middle over the hole in the lid or you’ll block all the steam (this took me AGES to learn).
7. Remember that you can also steam in the cooking basket (it’s smaller but much more effective for steaming).
8.[Gratuitous link to my recipe] Steamed puddings are particularly nice – try this one or google Varoma puddings and add on a few minutes cooking time.
Converting recipes for use in Bellini and other thermal cookers: Part 1 of 2
There are tons of blogs, forums, and Facebook pages with recipes for thermal cookers. These sources (and the manual for your machine) are a great place for new users to start for step-by-step instructions to build your confidence. Using recipes that are specifically written for thermal cookers also helps you try out all the functions of the machine.
Soon though, you’ll probably want to branch out and start adapting other recipes. You might have a much-loved cookbook, an online recipe, or have a family favourite to adapt. Below are some recipe techniques that will work particularly well in the thermal cooker.
Using a food processor/ blender or finely chopped ingredients
All thermal cookers have the ability to blend or chop ingredients so this will work well. Note that you can only chop, you can’t grate or thinly slice. Continue reading
Blending soup in the Bellini Intelli Kitchen Master
Apologies for the gap between posts. I thought I’d be all effortless and cool with my second newborn and keep up with the blog and all other normal life stuff. However, I have found to my disappointment that: a) it’s still bloody hard work the second time around, and b) waking up to find a missing teddy for a toddler, doesn’t prepare you for the mind-altering sleep deprivation of night feeding.
Anyway, a thermal cooker really does make a big difference when life gets busy. I didn’t do as much pre-newborn meal preparation as I should, but it’s still pretty easy to get a Bellini meal together quickly even when jiggling and shushing a baby.
Last week, I finally had a break through with soup in the Bellini. I’d read cautionary tales of burned hands and orange walls when blending soup in a thermal cooker. Continue reading

Butter-making in the Bellini
In a long-ago life as a primary teaching prac student, one of my classmates decided to run a butter making lesson for the Year 3s. She handed out glass jars filled with cream, salt and glass marbles (can you guess where this is going?) and encouraged the children to shake them as hard as they could…
It did end in tears, but luckily the prac student was the only one crying as the children somehow escaped injury after one of the jars shattered.
This butter-making technique is less likely to end in injury or a stern ticking off, and you’ll have some beautiful fresh butter at the end of it. If you buy cream that is near the use-by date, then it’s significantly cheaper than buying butter. Continue reading
Cool IKEA kitchen tools to keep your Bellini company
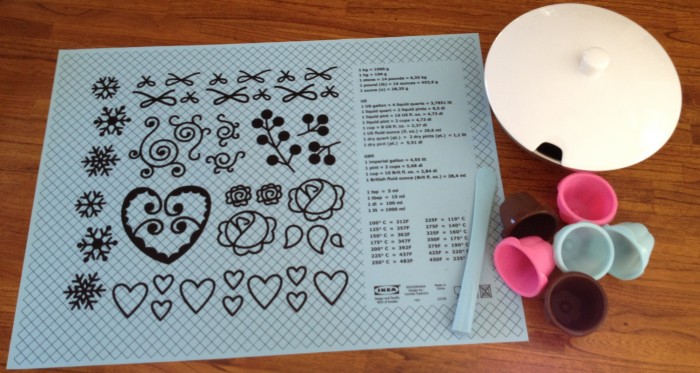
These three kitchen accessories from IKEA seem to go particularly well with thermal cookers. The first two are a cheaper version of popular accessories for the ThermoMix. I bought the third to make it even easier to make and eat steamed puddings easier (obviously not restricted to thermal cooking, but I have become sadly addicted since getting my Bellini).
1. Baking mat
I bought this after seeing a thermomix consultant wrap the ThermoMat around some pasta dough before leaving it to rest. Continue reading

Separating eggs in the Bellini Intelli Kitchen Master
Like the peeling garlic tip that I posted previously, this is a ThermoMix trick that I tested in the Bellini. I know it’s probably not life changing to separate the odd egg or two, but it’s still a pretty cool trick and would be handy if you were doing multiple eggs for a pavlova or meringues.
1. Put the measuring cup in your lid. If you turn the cup clockwise as far as it will go, it will ‘lock’ – you don’t want to lock it, so loosen it a little if it is locked in. Continue reading
Bits and bobs of the Bellini Intelli Kitchen Master: Part 3 – Steamer insert basket, butterfly and spatula
I was originally going to subtitle this post “stuff I never use”, but in the last few days I’ve actually found that some of these bits are more useful than I first thought. But I’ll start with the most neglected one.
Butterfly attachment

The butterfly tool clips on top of the blade (either mixing or chopping). The Bellini instruction manual states that it should only be used at Speed 3 or lower, and only for creamy or runny mixtures. I’ve heard of several people who have burned out their motors in the Bellini and other thermal cookers by using it for thick mixtures like risotto. Continue reading
Peeling garlic in the Bellini Intelli Kitchen Machine
A popular function of the Thermomix is the ability to peel cloves of garlic quickly and easily. The reverse speed is used, so the flat side of the blade hits the garlic clove, but doesn’t chop them.
I wanted to try this in the Bellini, using the mixing blade which has a blunt edge. For my experiment, I was armed with four heads of garlic and an episode of Play School to avoid toddler interruptions.
The Thermomix instructions (which vary from blog to blog) tend to suggest Speed 4 in short bursts of 3-6 seconds. Continue reading
Bits and bobs of the Bellini Intelli Kitchen Master: Part 2 – Five tips for the jug and blades
In my first installment, I looked at the base unit of the Bellini Intelli Kitchen Master. In this part, I take a look at the jug and blades of the machine. I was going to do another step-by-step look at all the parts but managed to even bore myself while writing it. So instead, here’s a list of Top Five tips for these items. Some of these have been gleaned from the fabulous folk at the Bellini Addicts facebook page (with a special mention to Jelena D. who is the Queen of all things Bellini, and so generous with helping people out). All these tips would work with most of the other thermal cookers too (except for the differences between the blades).
1. Cleaning the jug. Lots of people swear by putting some hot water and a drop of detergent in the jug, and then turning it on at a fast speed for a few seconds. I’ve never had much luck with this method. I take it to the tap, add detergent and then clean it with a long handled plastic dishbrush under a fast running hot tap. While the water is running, I swish the blades round with the end of the brush very quickly. 90% of the time, this will clean it beautifully without having to take the blades out.
2. Removing the blade. If you do need to take the blade out for cleaning or to swap to the mixing blade (see below), the Bellini booklet recommends that you “place the bowl in a vertical position” [also known as upside down]… “place a tea towel inside the bowl before disengaging lever and allow it to drop on to the towel”. It’s much easier to put the bowl on its side and remove the blades that way. You can often get away with swapping the blades with small amounts food still inside (e.g. a chopped onion) if you use this method.
3. Mixing blade vs chopping blade. The Bellini is the only thermocooker that comes with two sets of blades. This is an attempt to compensate for the reverse function of the Thermomix (which reverses the direction of the blade so food is stirred with the blunt edge of the blade rather than chopped).
I like to live dangerously and avoid changing the blades whenever I can, to the point of stupidity. It really doesn’t take long to swap them (see above), so god knows why I keep doing it. I don’t think it’s necessary to swap for risotto or * pasta sauces. However, pulses, cooked pumpkin and boiled potatoes really, really do need the mixing blade. *(tonight I swapped the bladeto mixing for risotto for the first time – and it was a noticeably less gluggy risotto).
4. Measuring cup in or out? The measuring cup controls the amount of steam that returns into the the food – a bit like leaving a lid on a saucepan. So if you are trying to reduce a sauce, you might want to leave it off. Always leave it on when blending or anything hot. If you are cooking at 100C, you will probably need to leave it on as the mixture usually splatters out of the hole otherwise. You might be able to leave it off if only cooking a small quantity.
5. Getting batter off the blades. Particularly when making cake batters etc, it becomes debatable if it really is faster to do it in the Bellini as it takes ages to get all the batter from under and on the blades. To speed up the process, remove most of the batter from the jug, then put it back in the base unit with the lid on and pulse it a couple of times. This will fling all the batter from the blades and to the wall of the jug. It is then easy to scrape it out with a spatula.


